Pages

Wednesday 7 July 2010

Dal tadka

On my recent cycling trip India, coming as it did after many meat orientated countries, was wonderful. Before India the premise had been that if it wasn't explicitly vegetarian then it probably had meat in it. With limited language abilities and strange scripts in use, opening up a menu and pointing at a random dish was somewhat problematic, and a damn shame to boot. In one place in Iran, as touristy as it gets there (i.e. not very), I got very lucky with an English menu and an English speaking waiter. I asked him if a dolmades "special vegetable" dish had meat in it. On being assured it did indeed have no meat imagine my surprise when the first forkful I took had a chewy animal bit in it. I spat it out and had a discussion with the waiter. "You said this had no meat!" "But it doesn't" "What's that then?", pointing at the ejected lump"Chicken" "But chicken is meat" "No it isn't". Right, we've got a linguistic problem here haven't we?

As I say, hitting India changed matters and pointing and ordering became a safe bet. Even so, some dishes I knew already, such as dal or dahl, which are legumes. Chana dal is yer chickpeas, masoor dal yer red lentils and there a host of others. Before I left home I'd had a good red lentil curry recipe ("slurry curry") anyway but I tried a dal tadka somewhere in Rajasthan and it was fantastic, both flavoursome and ideal for restocking the carbs and protein after a day of cycling, so I had to make it on my return.

Whilst there I got the impression it was basically a lentil dish made with cumin seeds with a fried dried chilli on top but when on my return to the UK I started looking into it there's more to it than that. Whilst you might think that tadka is like a Tarka but 'otter, it actually refers to cooking the spices and flavourings for a dish separately in ghee and then adding them into the main dish.

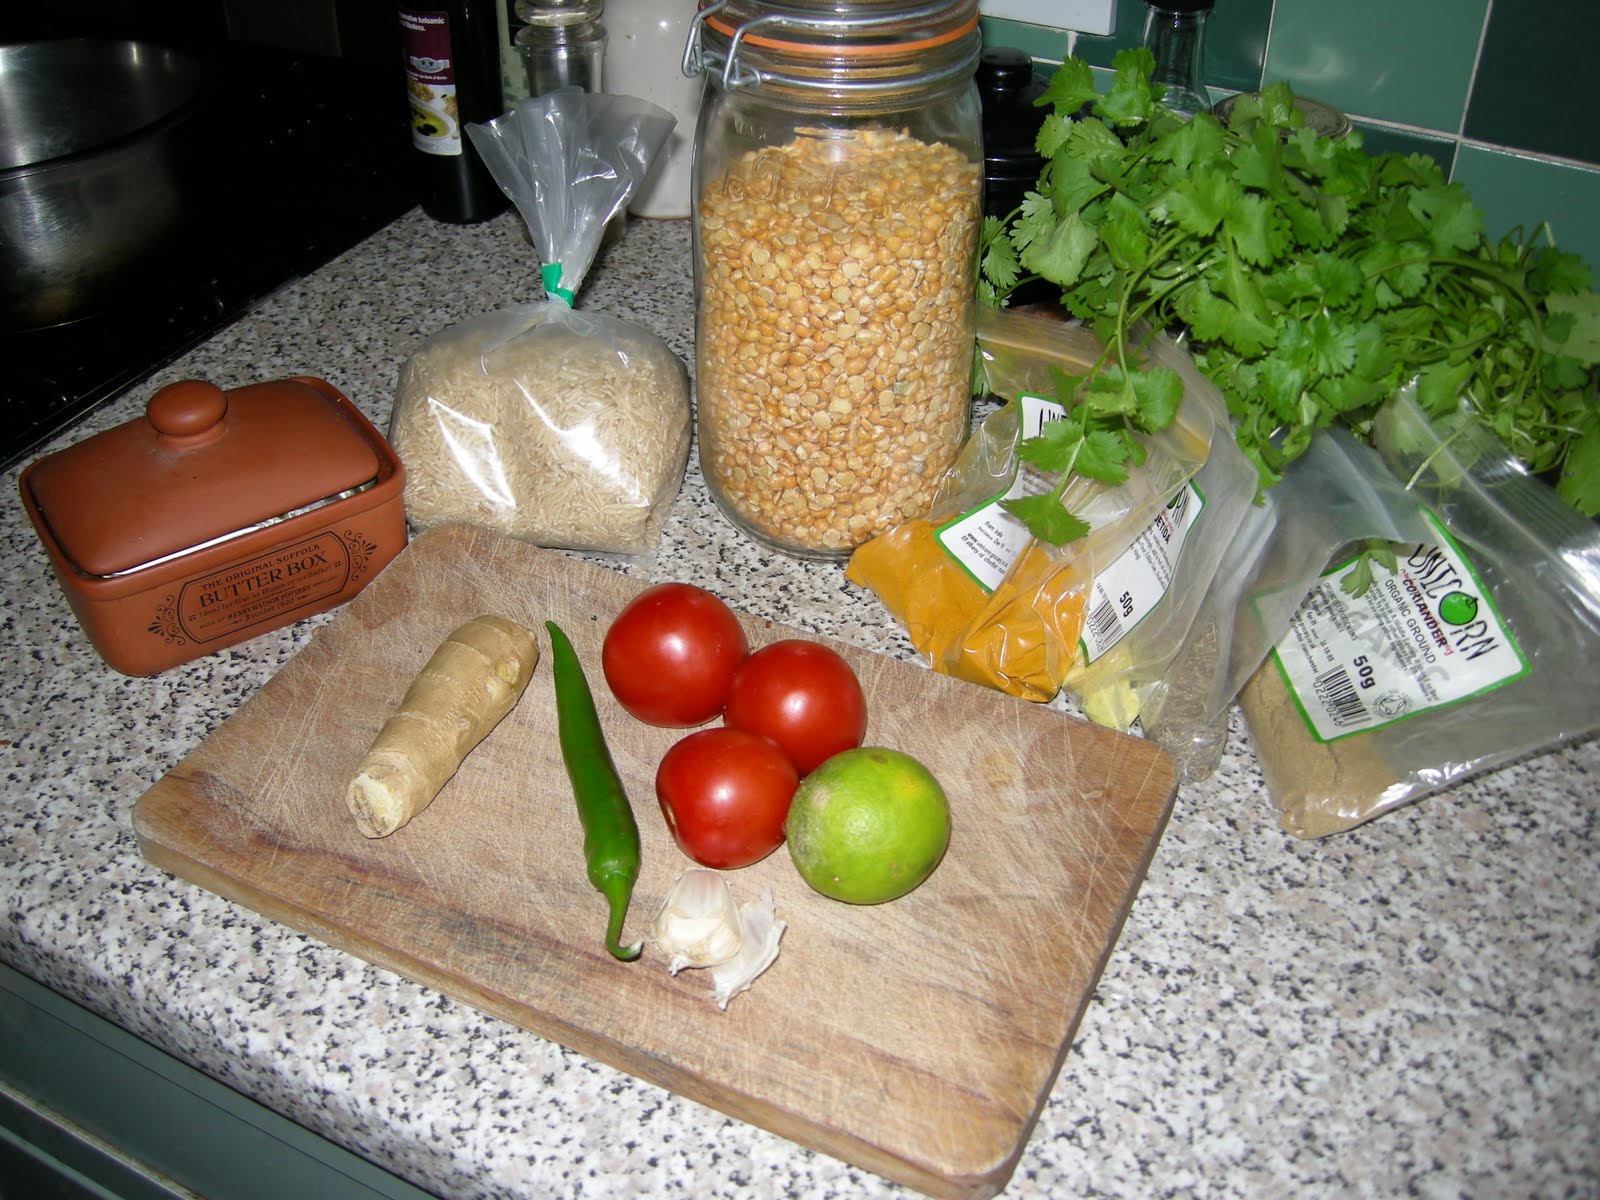
Some of the ingredients take a pre-show bow

Ingredients serves two hungry people.
Cooking time 20 minutes to 50 minutes.
  • 125g yellow split peas (or red lentils, see below), about 1 mugs worth (still not got scales so this is a guess)
  • Tsp turmeric
  • Tsp ground coriander
  • 30g butter (1/8 of a block)
  • 2 tsp cumin seeds (jeera in Hindi)
  • 1" fresh ginger, minced
  • 1/2 green chilli de-seeded and chopped
  • 2 cloves garlic, crushed
  • 1/2 tsp asafoetida (hing in Hindi)
  • two or three tomatoes (depending on size), diced
  • Juice of half a lime
  • Handful of coriander leaves (cilantro in US English)
Cover your dal with about half an inch of water, add the turmeric and ground coriander, bring to the boil then reduce to a simmer. They need to cook until they're just going mushy. How long that takes depends on what dal you're using, about 45 minutes for yellow split peas, 15 or 20 minutes for red lentils. You may find you need to add a little water as you go.

When the dal still has five minutes or so to go heat up your butter (or ghee if you've got it) until it's foaming then add the cumin seeds and fry them for a couple of minutes. If you've got any mustard seeds hanging about you could replace one of tsps of cumin with them.

Next add the ginger, chilli (add more if you like it hot), garlic and hing if you've got it. Cook for another minute or so then add the toms and give it another couple of minutes.

Making the tadka

Add the tadka mix to your cooked dal, squeeze the lime in, stir and give it a minute or so on the heat.

Tad-ka!

Serve topped with the coriander and roti or basmati rice. Or any other rice will do, won't it?

Ingredient notes
I used the yellow splits for this recipe as I initially thought that that was I'd been having in India. That and I've got jar of them hanging around that need using up. However, on investigation it seems that what I had in India were actually yellow pigeon peas, or toor dal. Still got those split peas to use up though so I went with them anyway and they worked.

Lentils are great though, 26% protein, full of iron with red lentils being a native of the fertile crescent and as such one of mankind's first food crops. I'd recommend Jared Diamonds Guns, Germs and Steel at this point as a cracking good read with some interesting stuff on this sort of thing. Mix lentils with a grain such as rice and you've got a complete protein food (all essential amino acids there in the quantities you need).

Hing, which is easier to spell than asafoetida, is a very pungent spice that adds a kind of garlicky onion taste. It's also reputed to reduce flatulence from lentils which is why I'd recommend it for this dish. If you do get some be sure to store it in an airtight container so it doesn't contaminate other foods you store it with, it really does smell. If you don't have any and don't really fancy getting any either just omit it or try starting the tadka by frying up an onion for ten minutes. Fact lifted straight from wikipedia "In India, industrial cooking gas sold in metal containers is often scented with asafoetida. The scented gas has a distinctive strong sulphurous, garlic like odour which helps to detect any possible leakage of gas quickly". Cool.

When it comes to the chilli, this recipe is underpowered as Helen doesn't like spice. I do so I just sliced up the rest of the chilli and put it over the top of mine. Also, if you have any reasonable sized dried chillies you could try cutting it in half and quickly frying it (for a minute?) separately then putting it on the top of each prepared dish.

Saturday 3 July 2010

Veggie Pad Thai

Gathering the ingredients

Ah, Pad Thai! The name (also Phat Thai) means "fried Thai style" and it's classic street food, something knocked together on a cart in front of you for a few pennies. Fresh and tasty, a definite favourite of mine. Pad Thai can be veggie, although it's generally got fish sauce added and options of prawns or meat. No matter though, you just ask for it without. Street Pad Thai is generally quite a dry dish, slightly different from the wetter versions you'll find in an English Thai restaurant and I'll be going for the former rather than the latter. This means that prep is quite important here but don't worry there's not much to do. Approximate prep time is 20 minutes and cooking time, well, lets call it 10 minutes although bear in mind this is best cooked one portion at a time.

Prepping the ingredients

Ingredients for one portion
  • Dessert spoon Tamarind pulp
  • Dessert spoon brown sugar
  • Dessert spoon light soy sauce
  • 90 grams dried rice noodles (i.e. quarter pack)
  • Oil for frying
  • 50 grams of tofu cut into chips approximately 1" by 1/3" by 1/3". I used smoked tofu this time but any decent firm one will do. Missus.
  • Pinch of red chilli powder or diced fresh red chilli. You judge how hot you want it although it's not meant to be an overly spicy dish as far as I can tell
  • Half a shallot finely diced
  • Four spring onions sliced into 1" sections for the green stem, less for the bulb
  • Clove of garlic, crushed
  • Egg
  • Handful of bean sprouts
  • Unsalted roasted peanuts roughly chopped
  • Wedge of lime
  • Handful of fresh coriander
  • Granulated sugar
  • Dried chillies
Making the sauce
Put the tamarind paste in a small bowl, add the same quantity (or a little more) of hot water and mix it together. If it's anything like the tamarind paste I picked up from local Asian grocers it'll be full of seeds and bits so remove them by hand and make a paste up. Bit messy, sorry! I have had jars of tamarind concentrate before which are a lot less fuss but I'd run out and the nearest stockist is a Chinese supermarket a few miles away so I went with this. Once you've prepared it add the sugar to balance out the lovely tart sourness of the tamarind. Finally add in the light soy sauce. If you're using fish sauce substitute it here.

Prepare your noodles by soaking them in a pan of hot water for about 8 minutes. Obviously, this will depend on your noodles but you want them slightly al dente, bendable but still a little firm and not fully puffed and saturated.

I estimate the frying time to be about five minutes so when you put your noodles in sling the wok on the heat, add the oil and get it hot! Fry the tofu for three minutes but don't let it burn. Then add in the shallot (if you've not got a shallot just use a small amount of onion ~ I'm lucky that a local shop sells then by weight so picking just one up is not a problem), chilli, garlic and spring onions. Remember, this is a stir fry so do stir it frequently!

Stir stir, fry fry

Give it another couple of minutes then push the mix to one side and add the egg. As soon as you add it chop it up to kind of omelette-ise it. Give it a minute of mixing and moving.

Add the noodles and sauce. Mix the lot together and heat through. If your noodles are a little too dry add a bit of water and soften them up.

All there bar the beansprouts which kind of obscure the view when added

Add the coriander and serve with the beansprouts over the top, a slice of lime, the peanuts, some dried chilli and the granulated sugar on the side. Personally though I avoid the sugar and have substituted green chillies in rice vinegar for the dried ones (slice a green chilli and leave it over night in a jar covered with a generous dose of vinegar).

Monday 7 June 2010

Veggie lasagna

Lasanga, bane of food photographers!

Lasagna, so beloved by both Garfield and me, is classic comfort food so given that it's a miserable soggy Monday with no job leads I'm going to put one together. Added to which I did promise Mr Tom Harris of Stafford, a very old friend of mine, the recipe when I visited him for tea and Cornish pasties the other day.

As I've been making this for quite a while I do actually for once have something of an idea of the quantities involved but as I still haven't found the kitchen scales I can't actually give them to you. This probably isn't so bad as a lot will depend on the size of your lasanga dish. The one I use at the moment is actually meant to be some sort of roasting dish but it's rectangular shape is almost ideal for lasanga.

For this recipe I've tried to put the actual instructions in italics with the rest being my ramblings.

Some of the ingredients do a roll call around the dish

Ingredients
  • Good glug of olive oil for frying
  • Medium onion, finely chopped
  • Couple of bulbs of garlic, or one large bulb, crushed or finely sliced
  • A few mushrooms, sliced
  • Medium courgette, quartered and sliced into quarter inch chunks: they've got to go into layers so not too big!
  • Half an aubergine/ one small aubergine/ three very small aubergines (which I got from an Asian grocer this time round). Cut into quarter inch chunks.
  • Half a yellow pepper and half an orange pepper again in a quarter inch chunk. Obviously any old colour of pepper will do if these prove to be expensive or unavailable, it's mostly a matter of colours here. When I get a yellow variety of courgette I'll use a green pepper.
  • Half a packet of Quorn mince or similar.
  • Two tins of chopped tomatoes (400 gram tins)
  • Red wine to cover half an inch/ 1.5cm ish of the bottom of the tom tins.
  • 67 grams of tomato purée. That'd be a third of a 200 gram tube funnily enough ;)
  • Half a teaspoon of sugar
  • Freshly ground black pepper to taste
  • Handful of stoned black olives, roughly chopped
  • Oregano and basil
  • About 25 grams of butter or marg
  • Three heaped dessert spoons of flour (25 grams, same as the butter)
  • 450 ml of milk
  • Lasanga sheets
  • Grated cheddar to cover

Gently fry the onion for a couple of minutes until it starts to soften. Add the garlic and continue frying for another couple of minutes. When it comes to the garlic I have two different methods. I either use a garlic crush or place it on the chopping board under the blade of a good broad knife then use the heal of my hand to smash it after which a quick thin slicing will ready it for cooking. If you want to capture all the juice put the garlic on a bed of salt for the latter technique... I don't, particularly for this recipe, but some people do.

Chop chop

Add the vegetables and sweat the mix down for a while by putting it on the lowest heat and covering it. Stir occasionally and do something else in the meantime, such as writing a blog. Around ten minutes should do it: check the state of the mushrooms, you want them to look reduced but still fresh and having given up their juice. Sweating like this allows the flavour of the vegetables to be a bit more concentrated. It's pretty important for the onion and garlic, less so for the rest but it does make for a smoother texture and better flavour in my opinion.

Once the vegetables have been sweated add the Quorn mince (or other meat substitute) then the tinned tomatoes. Use the wine to rinse out the last of the juice from the cans, add that, the tomato purée , sugar and fresh black pepper.

A few words here... of course you don't have to use Quorn mince, there are plenty of other mince substitutes out there. Unicorn Groceries in Chorlton have a very nice tofu mince that's ideal (use a whole pack) but they're shut on a Monday so I went for the Quorn. Be aware that some other mince substitutes will require you to add more liquid, so read the packet first. Some just say add water but in that case I'd be tempted to use wine instead. Your call. Oh, and the tiny bit of sugar is in there just to bring out the sweetness of the tomatoes.

We're going to cover it and simmer it for a while now. 45 minutes should do the job although if you're pressed for time you can do it for less. Ten minutes before the end add the black olives and dried herbs, five minutes from the end add fresh herbs. This time I'm adding about two heaped teaspoons worth of oregano and some fresh basil I've been growing.

When it comes to the olives for goodness sake don't use those bloody waxy ones you get so often in the UK. See if you've somewhere who will sell you good value wrinkly ones. In Manchester Unicorn are great for this, elsewhere if you have a Middle Eastern deli you should be able to pick up something similar although you might need to stone them yourself. You want them salty and full of taste! If you can't get something like this just forget it and add a bit of salt to the sauce instead.

Towards the end of your simmer it's time to make your bechamel sauce. Now's a good time to put your oven on btw, you want gas mark 4 or 5 (around 350F to 375F or 180 to 190C apparently). Just a caveat on the milk here first: I use soya milk, it's a hang over from when I was a vegan many many years ago (in a galaxy far far away) but it shouldn't make too much difference. We're making enough to cover the top of the lasanga, as I don't actually put it in every layer, so you might want to check how much you'll need by filling the bottom of your lasanga dish to about a quarter of an inch of milk.

First we're going to make a roux. Heat the butter or margarine in a heavy bottomed pan on the lowest heat until it's just foaming then take it off the heat and add the flour. Whisk the mix together then return to the heat and add the milk in a bit at time, whisking as you do. Whisk whisk whisk! The more milk you add the less important the whisking is but if you don't whisk properly it'll go lumpy. Once all the milk is in and nicely whisked you want to gently bring it to a simmer then turn the heat off. When the sauce is ready just turn off the heat and put a lid of the top which will slow down the formation of a skin on it (don't worry though, meh, bit of skin, so what?). I understand that when making a traditional bechamel sauce you'd preheat the milk but come on, that's just adding another pan to the washing up! Sod that.

We're ready to put the lasanga together. Spoon a good layer of the bolognaise style sauce into the bottom of the lasanga dish then add a layer of the lasange sheets. Repeat until you've used up all your sauce and have a layer of pasta on the top (for me, this is three layers of sauce and three layers of pasta) then add the bechamel sauce and finally top it with grated cheddar. Don't use pre-grated cheddar, please. It's really really bloody lazy. Buy a block, about 100 grams worth (4 oz) and grate it yourself. It's not difficult, it's cheaper and you get to choose your own cheese. And don't get me started on pre-sliced carrots... grr... and relax.

Pop it in the preheated oven for 35 minutes or so until your cheese has gone golden brown. Serve with a glass of red wine.

If you need to reheat some the next day and don't have a microwave, put a few holes in the lasanga and dribble a little milk in, cover it with foil then gently heat in the oven until warm. Damned if I know how long that takes, I always seem to bodge it but at least it helps it remain moist and unburnt!

Saturday 29 May 2010

Hazelnut meringue with raspberries and whipped cream experiment

It's a boring Saturday and raining out so I thought I'd give making meringue a go. Specifically I was going for a hazelnut meringue torte with raspberries and whipped cream. Yum.

Confession time. I've never made a meringue before in my life. First task then was to get the various bits and bobs I needed, which first meant looking at a few recipes then getting myself to the shops. Remember that rain I mentioned?

Recipes are all fairly similar. You're basically beating sugar into egg white, with maybe a dash of something to stabilise it, in order to form a sugar/ protein lattice. Apparently. It would appear that you don't want the eggs too fresh, which was ideal for me as the ones I had were about a week old.

Having secured the ingredients and got home the next hurdle turned out to be a lack of kitchen scales which are still consigned to a box somewhere in the Cellar of Doom. I really didn't fancy my chances in finding them and whilst normally I'll wing quantities in recipes as I said, I've not made this before. This means I've not got a clue how sweet, for example, meringue should be at any given stage so I was happy to find a measuring cup. It was around this point I decided to shift from making torte to just knocking up a smaller amount of hazelnut meringue topped with cream and raspberries as more of an experiment.

Enough preamble, let's go for the recipe. I've mostly lifted it from The Dairy Book of Home Cookery, which I've still got to return to my mate Russ after we shared a flat together in the mid 1990s, and then added the hazel nuts at the end.

Ingredients
Two egg whites
Pinch of cream of tartar
Half a cup of caster sugar
Third of cup of (roasted) hazelnuts
Baking parchment paper
Double cream
Raspberries

Put the egg whites and cream of tartar in a mixing bowl and beat it until it starts to get "stiff and peaky". Whisk whisk whisk. Hmm. Begs the question, what is "stiff and peaky"? Taking Viagra with a head cold? Still, it reached a point which I reckoned fitted the description so I moved on to the next step.

Not looking quite stiff and peaky yet I think

Add half the sugar and continue whisking until the mix is shiny and "stands in firm peaks".

Add the remaining caster sugar and beat until the meringue is "very stiff and and silky looking and texture is fairly close". Close? Close to what? I actually added the sugar in small batches at this point, seemed like a good idea, don't know why. It was at this point that the handle fell off the whisk.

Whoops.

Fold in the hazelnuts.

Spoon onto a baking tray lined with the baking parchment paper, place into a preheated oven on gas mark 2 for twenty minutes, turn the heat off and leave in the oven for another hour.

Ready for the oven

As they cooked I made the left over yolks into fresh mayonnaise. Shame that ideally you need fresh yolks for mayo though, which was all a bit of a mismatch. By the way if I get hold of very fresh eggs I always go for poaching where freshness is the key not adding bloody vinegar.

When the bases have come out of the oven and cooled whisk up some cream, smear it over the top and then add the raspberries. Or strawberries, or whatever, or just eat them as they are.

Mint leaves purely for presentation. Sorry.

Now, one slight problem here, the tops have risen but the base is a little soggy. Nice but not quite right. Guess I'll just have to whisk harder and longer next time. Maybe it'd be easier to get an electric whisk but quite aside from me being on the dole now, I think it might be the thin end of the wedge. Next thing you know I'd be getting a microwave!

Monday 24 May 2010

Pho chay

Let's kick this blog off with tonight's meal, Pho Chay. I've visited Vietnam a couple of times and am a big fan of Vietnamese cooking. I can't vouchsafe for the North but in the South it's easy to find vegetarian food, just look for places with "chay" on them. A classic dish there is pho bo, beef and rice noodle soup, not something I've tried but the veggie version, pho chay is gorgeous.

It's ideal food for a hot climate with it's savoury stock base providing liquid and salts, great for cycling or a hangover and a solid (in the loosest sense of the word) breakfast dish. On doing a bit of internet research it appears one of the main drivers in the soup base is star anise. I ended up adopting a recipe I found which used Chinese five spice rather than a mix of individual spices on the grounds that I've yet to rebuild my spice collection after returning from travelling. Before I get on with the recipe I must add a couple of small caveats. Firstly all measurements are very approximate, I tend to wing things like that, sorry. Secondly, I have no idea about how to write up recipes, bear with me as I try to develop a style.

Pho Chay (serves two I reckon, I rounded up the quantities)


Soup base
1.5 litres of vegetable stock
Top of a leek
1 onion, cut in half
2" piece of ginger, crushed (I used a heavy knife and bashed it with the handle)
4 pieces star anise
3 teaspoons Chinese five spice
Water from shiitake mushrooms
Soy sauce
Sugar (half a teaspoon)
Japanese ume plum seasoning (see below)

Ingredients
Can of mock duck (available at Chinese supermarkets, although you could happily substitute firm tofu)
Rice noodles
Bottom half of the leek, sliced
Few dried shiitake mushrooms, rehydrated and sliced
Small carrot, diagonal cut
Half a red pepper, cut into strips
Handful of green beans and broccoli spears. These were going cheap at the supermarket, use`what you want really. In Vietnam I'm sure I had slices of well cooked turnip in a couple of pho's
Beansprouts
Fresh coriander
Fresh basil
Chopped green chilli
Wedge of lime

Putting it all together.
Put the shiitake mushrooms to soak in boiling water for as long as possible (give them a quick wash off first to remove debris). If you're just starting the recipe then chuck them in the stock and fish them out towards the end.
Trim the outer most layer of the onion off and cut in half. Add it to the stock along with the green leaves from the leek top, the crushed ginger and star anise. Simmer the lot for 45 minutes or so. Use the time in between to listen to Radio 4, do the washing up and prep other ingredients.
After 45 minutes add the five spice, soy and sugar and let it all simmer for another quarter of an hour.

When it's on the final quarter of an hour it's time to start sorting out your other ingredients. The packet rice noodles (banh pho) I was using needed to be cooked for around 6 to 8 minutes and I estimated that the rest of the ingredients would take a little less time to stir fry so started working with that time frame in mind. It was the noodles in first, then over to a wok. Chuck the diced mock chicken in and stir fry in a little oil for a minute or so, then drop in the leek, carrot, mushrooms and pepper. At the same time I put the beans and broccoli spears in to steam over the rice noodles for a couple of minutes. When they were done I dropped them into the wok to stir fry with the rest of the veg for the last couple of minutes.

Then it was just a matter of draining the noodles, placing them in the bottom of the bowl with the stir fry over the top and ladling over the soup. Serve with plenty of fresh basil, coriander, sliced green chilli, a wedge of lime and beansprouts to add as you go along. Thing about beansprouts is if you add them all at once or during the cooking they loose their marvellous crunch and I do like a bit of crunch!. Oh, and the Japanese ume plum seasoning? When I tried the stock in the pan it was OK but needed a bit of umph (I probably mean likely umami) so I added a dash. If you've not got any and you feel it needs that umph you could add rice wine vinegar or more soy, or just use a stronger stock.

Welcome to Feeding Bill!

Now, I'm not entirely certain what I'm doing with this blog. As people who know me know, I am a bit of a veggie foodie so obviously it's about food but further than that I have not got as yet. I suspect it'll catalogue what I'm eating, with a few recipes thrown in for good measure. Let's just see what happens, eh?